Friday, September 30, 2011

Tomato soup

Tomato Soup: Ingredients harvested from my garden


Have you grown more tomatoes then you know what to do with?  Here is a tasty solution.  Soup is awesome cause you can add whatever you want.  I added one jalapeno, some onions, and garlic.  I also used fresh oregano and thyme from my herb garden.  In the picture I had some eggplant.  In the end I decided not to add the eggplant just because I wanted to keep it simple.


You will need:
4 cups of diced tomatoes
2 cups beef broth
1 jalapeno
1 cup of chopped onion
3 large cloves of garlic
fresh oregano
fresh thyme
pepper
salt
2 TBSP sugar
2 TBSP flour
2 TBSP butter

chop up your tomatoes, jalapeno (remove the seeds...unless you want it super spicy) garlic, and onion.  In a large pot add the broth and your chopped veggies.  Bring to a boil and simmer for about 20 minutes.
blend your veggies until smooth.  Set aside while you make your roux.  Roux is a mixture of flour and fat...usually butter.  It is a thickening agent for sauces and soups.

Melt the butter and then add the flour.  whisk while you are cooking and let cook until browned.  A bit more browned then this picture shows.  I didn't have time to take a picture of the done roux cause I was afraid it would burn while I took the picture.  When you have a nice brown look add a bit of the pureed tomato.  Whisk together, then add the rest of the tomato.  add the sugar, then add pepper, salt, thyme, and oregano to taste.


Thursday, September 29, 2011

Jalapeno Jelly

Jalapeno Jelly
This year I had a hard time with my garden.....but I still kicked butt at growing peppers!  Peppers must love my soil cause it seems to be the only thing I'm good at growing.  Last year I made salsa with my peppers, but they had such a pretty color so I thought I would try jelly.  Jelly can be pretty intimidating but it really isn't that bad.  This recipe is very simple.

You will need:
12 oz of Jalapenos stemmed, and seeded (about 25 peppers)
2 cups of cider vinegar, divided
6 cups granulated sugar
2 pouches of liquid pectin
food coloring optional

First prepare your jars and lids.  The recipe calls for five 8 ounce jars but I used about 8.  In order to prepare the jars and lids you can either boil them or just put them through your dishwasher.  Next prepare your peppers.  Wear rubber gloves for this step, you may not feel it while you are cutting the peppers but the acid is burning your skin.  If you are really sensitive you may want a face mask.  I didn't wear a mask, and it wasn't as bad as habaneros but I still coughed and choked a bit.  You don't even have to have your face that close to the peppers, just being in the kitchen can cause you to choke on the smell of the peppers.
 
Cut off the stems, remove the seeds, and cut into quarters.  Add 1 cup of the vinegar and all of your peppers in a blender or food processor.  Blend until the peppers are smooth.


In a big stainless still pot, add the rest of the vinegar, sugar, and jalapeno juice.  Bring to a boil over high heat, stir constantly on this high boil for ten minutes.  Stir in the pectin and boil for another minute.  Remove from heat and if you are using food coloring add a couple of drops.  If your jalapenos are green use green food coloring to enhance the color.  Skim any foam off the top and pour into your prepared jars.  Leave about 1/4 inch of head space at the top.  Before putting the lid on make sure you wipe the rim.  Any food particle can cause the lid not to seal.


Place jars in a canner, cover completely with water and bring to a boil.  Boil for ten minutes...If you are at a higher elevation follow this chart:

feet:                                      Increase processing time
1,001-3,000                          5 minutes
3,001-6,000                          10 minutes
6,001-8,000                          15 minutes               
8,001-10,000                        20 minutes

Since I live in Utah I had to increase for 20 minutes....for a total of 30 minutes.
When removing the jars keep them level, and place in an area they wont get knocked over.  Leave them for about 24 hours.  The next day check the lid and make sure it has sealed.  You can eat this with crackers and cheese.

Tuesday, June 28, 2011

Daring Kitchen challenge June 2011: Baklava

Erica of Erica’s Edibles was our host for the Daring Baker’s June challenge. Erica challenged us to be truly DARING by making homemade phyllo dough and then to use that homemade dough to make Baklava.

 This challenge was indeed a challenge for me.  It was very labor intensive, it took me about 3 hours to roll out all of my phyllo dough and by the end I wasn't doing that very well either.  I wont go through the step by step of rolling out phyllo dough just because I didn't really get the hang of it.  This video here shows how to roll out phyllo dough, mind you, this lady makes it look easy!  There are a couple of things I learned along the way, but the number one is....I will probably always buy pre made phyllo dough.  Yes, I said it, I usually am totally for making everything from scratch but unless you have a whole day to dedicate to making this desert then I suggest you buy the frozen dough.  You can see that I started to get tired rolling the dough because the layers are a bit thicker on top where as on the bottom they were paper thin.  Yes it still all tasted very good, but they were not as pretty as I had envisioned them.  For the dough recipe comes from 'Kafeehause' by Rick Rodgers, and the Baklava recipe is from Alton Brown with a couple of variations changed by me.

Phyllo dough-I doubled this recipe
1 1/3 cups unbleached all purpose (plain) flour
1/8 teaspoon salt
1/2 cup less 1 tablespoon  water, plus more if needed
2 tablespoons vegetable oil, plus additional for coating the dough
1/2 teaspoon cider vinegar,

For the Baklava-
Filling:
1 tbsp ground cinnamon
2 tsp allspice
8 ounces hazelnuts
8 ounces pistachios
2/3 cup sugar
1/4 cup water
8 ounces unsalted butter
2 tsp rose water
Syrup:
1 1/4 cup honey
1 1/4 cup water
1 1/4 cup sugar
1 cinnamon stick
orange peel


To make the phyllo dough mix all of the dry ingredients with a paddle mixer, combine water, vinegar, and oil.  Add a bit more water until the dough comes together.  Change to a hook mixer and mix for ten minutes, then hand knead for another two.

Cover in vegetable oil and allow to rest for 2 hours in a covered bowl.


Roll out the dough in multiple sheets, check the video I posted above for a reference.  I rolled out all of my dough first and then I started to assemble my baklava...this I feel was a mistake.  As I layered the dough it wasn't really sticking together so I though I was fine but after I cut all of it to fit my pan I had an extremely hard time separating them.  I suggest rolling out your dough and assemble the baklava at the same time so you don't run into this mistake and have to pry the paper thin sheets of dough off of each other.


For the filling, Grind up the hazelnuts and the pistachios.  I used an old coffee grinder, and it worked great!  Add the cinnamon and all spice.  Using a small spray bottle add 1/2 cup of water with 2 tsp of Frangelico.  Melt the butter and using a brush, brush your pan with some butter.  Lay down a sheet of phyllo dough and the cover this with butter.  Repeat about 9 more times, then top with 1/3 of the nut mixture and spritz thoroughly with the Frangelico water.  Top with 6 more sheets of phyllo and butter and the add another third of the nuts and spritz with Frangelico water.  Repeat another 6 sheets and then use the rest of the nuts and spritz with rose water.  Top with 8 sheets of phyllo and butter the generously brush the very top layer with a lot of butter.  I didn't take any pictures of this process because I was already frustrated with my phyllo sticking together and I didn't want to bother with the camera....
Place in a 350 degree F oven for 30 minutes.  Remove pan from oven and cut into triangles or squares.  During this 30 minutes I had time to cool off so I had the patience to create a little triangle design.  Place in the oven for another 30 minutes and then cool for about 2 hours.


During the last 30 minutes of cooling, make the syrup.  Add all of the ingredients into a large sauce pan and bring to a boil.  Boil for about 10 minutes, stirring occasionally.  Remove from heat and remove the cinnamon stick and orange peel.  When the baklava has cooled for two hours, re-cut the baklava and then slowly pour the syrup into the pan.  Allow the pan to sit and completely cool and then cover and sit for 8 hours or overnight before serving.

As you can see, the top layers are a bit thicker then the should be due to my frustration and my patience running out haha.  It still tasted very good though.

Monday, June 13, 2011

MIxed berry crumb cake

I couldn't find my camera while I was making this so the pictures were taken by my phone which isn't the best quality, so I apologize for the pictures.  I've been wanting to make up some sort of berry cake for a while and now that berries are about to be in season I couldn't wait.  In my garden I have four raspberry bushes and one black berry bush.  They haven't produced berries yet but when they do I will have a bunch so many berry recipes to follow after this one!  For this cake I bought the berries, but since they are in season the berries were inexpensive.  You can also use frozen berries which are cheaper but taste just as good as the store bought fresh ones, of course berries from your garden will always taste the best!
Streusel:
1 1/2 cup crushed Nilla wafers
3/4 cup sugar
3/4 cup chopped almonds
1 tsp cinnamon
1/4 tsp ground cardamon
1/2 cup melted unsalted butter

Cake:
2 cups unbleached flour
1 cup sugar
2 1/3 tsp baking powder
1/2 tsp salt
1/2 cup unsalted butter (room temp)
2 eggs (room temp)
2 tsp vanilla
1 cup milk

Berries:
6 oz raspberries
6 oz black berries
3 tbsp lemon juice
1 tbsp sugar

Mix all of the streusel ingredients in a medium bowl.  First I mixed all of the ingredients together except for the melted butter.  Then I added the butter and mixed everything with a wooden spoon until the butter was evenly distributed.  For the cake there will be three layers of streusel.  Set the streusel aside and make the batter for the cake.  In a medium mixing bowl add the sugar and butter together, mix until creamy then add the vanilla, milk, and 2 eggs.  Add the rest of the ingredients and mix until smooth.  For the berries place both in a small bowl with the sugar and lemon juice.  Gently toss until evenly coated, make sure you don't break the berries.


For the construction of the cake, spray a 9 inch spring for pan and press a 1/3 of the streusel evenly on the bottom.  
Pour half of the batter over the bottom layer and spread it so it is an even layer.  Add half of the berries, I placed them in one by one to make sure they were evenly distributed.  Gently press down on the berries so they are in the cake batter.  Sprinkle half of the remaining streusel evenly over the batter and then pour the rest of the batter into the pan.  Place the remaining berries into the second layer of batter and then sprinkle the rest of the streusel evenly over the top of your cake.
Bake at 350 degrees F for about 60 minutes, test by poking the center with a toothpick.  Allow the cake to cool in the pan for about 10 minutes before removing it.


Yummy moist berry cake tastes best with coffee or hot tea in the morning.  This is a tasty alternative to coffee cake.


Tuesday, May 31, 2011

Sourdough starter...it's alive!!!

A sourdough starter is simple and you shouldn't let it indtimidate you.  All it takes is time and patience.

Sourdough starter:
1 1/2 cups lukewarm milk
1/2 tsp active dry yeast
1 tps honey
2 cups unbleached white flour
1/4 cup water

I started this on the 18th, on the 19th 20th and 21st you stir your mixture.  On the 22nd you feed your mixture with flour and water.  Let's begin!
First, heat your milk until it is about 110 degrees F.  Place in a large bowl and add the yeast, honey, and 1 1/2 cups flour and mix together.  Cover with plastic wrap and store in a warm draft free space.
This is the mixture on the 19th,
20th, 
and the 21st. 
On the 22nd add 1/4 cup flour and 1/4 cup water.  mix and let sit for about 4 hours.  The mixture will smell like beer and have a slight sour punch to it.
Store in the refrigerator in a bottle.  Punch out small holes in the top because your mixture is alive and it needs air.  The mixture will last about four weeks.  Use this in any sourdough recipe.

Friday, May 27, 2011

Marquise on Meringue

The May 2011 Daring Bakers’ challenge was hosted by Emma of CookCraftGrow and Jenny of Purple House Dirt. They chose to challenge everyone to make a Chocolate Marquise. The inspiration for this recipe comes from a dessert they prepared at a restaurant in Seattle.

This recipe isn't too challenging but it has a lot parts to it so it is a bit time consuming.  The finished product is so tasty and everything keeps really well in the refrigerator except for the meringue.  The Marquise melts really easy so keep it frozen until you are ready to serve.

Chocolate base (used in the marquise recipe)
6tbsp bittersweet chocolate about 70% cocoa
3 oz heavy cream
1/8 tsp salt
1/8 tsp nutmeg
1 Tbsp Frangelico (hazelnut liquor)
1 Tbsp agave syrup (or light corn syrup)
1/4 tsp canilla
1 tbsp cocoa powder
1/2 Tbsp unsalted butter
1 Tbsp ground coffee


Chocolate Marquise
3 large egg yolks at room temperature
1 large egg
2 Tbsp and 2 tsp of sugar
1 tbsp and 1 tsp water
Chocolate base
4 oz cup heavy cream
1/2 cup cocoa powder

Torched Meringue
3 large egg whites
1/2 cup minues 1 tsp of sugar
1/8 tsp vanilla

Roasted Walnuts
1/2 cup sugar
1 tsp cinnamon
1/4 tsp nutmeg
1/2 tsp salt
1 large egg white
1 cup shelled walnuts

Frangelico caramel
1 cup sugar
1/2 cup water
1 cup heavy cream
3/4 tsp slat
2 Tbsp Frangelico

First make the chocolate base.  Melt your chocolate, I just put it in the microwave which can be tricky cause you don't want to burn it.  To be on the safe side it is probably best to melt it using a double boiler.  Add the melted chocolate to the rest of the ingredients listed for the Chocolate base in a large bowl and set aside.


To make the Marquise, place all of the egg yolks and full egg into a mixer and mix on high for about 10 minutes or until the eggs are thick and pale.  When the eggs are just about done, combine your sugar and water in a saucepan and boil until it has reached about 235 degrees F.  Turn your mixer on low and slowly add the sugar syrup into your eggs.  When all of the syrup has been added turn the mixer back on high until the bowl is cool to the touch...about 2-3 minutes.  In a separate bowl whip the heavy cream until it has soft peaks and set aside.  add the chocolate base to the egg mixture and whisk to combine.  Fold 1/3 of the whipped cream into the chocolate mixure, and then add the rest carefully folding in the chocolate so you keep the air in the cream and eggs.
Line a baking pan (8X12) with parchment paper and pour the chocolate mixure in.  Spread it with your spatula and then cover with plastic wrap.  Make sure the plastic wrap is actually touching your Marquise so no air gets trapped inside.  A couple of bubbles here and there are not a big deal so don't worry over them.  Place this in the refrigerator for about 6-8 hours or over night.

Next make the nuts.  Combine all of the ingredients for the nuts in a bowl and mix so that the nuts are evenly coated.  In this picture I used brown sugar and it was too much so above I wrote to use regular sugar instead.  When the nuts are evenly coated pour them out onto a pastry lined baking pan and place in a preheated oven of 350 degrees F for about 15-20 minutes, or until the nuts are lightly browned.  Take them out of the oven and allow them to cool.

Next make the caramel.  I don't have any pictures of me making the caramel because you have to time everything just right otherwise you burn your caramel and I didn't want to mess with the camera.  To make the caramel, put the sugar and water in a saucepan and cook until the water has evaporated and the sugar is a dark mahogany color.  Quickly whisk in the cream to the darkened caramel, you can remove from the heat to do this if you are afraid the cream may overflow.  Return the pot to the heat and mix your caramel with a whisk until all of the hardened sugar has broken up.  When the caramel has darkened to the point you want it remove it from the head and add the salt and Frangelico.

The last thing to make is the meringue.  Beat the egg whites until they become foamy.  With the mixer on high, slowly add the vanilla, and then the sugar.

Continue to mix on high until you have a shiny stiff mixture.  To make sure the sugar is mixed in thoroughly take a bit of the meringue and rub it between two fingers.  If you feel a little grit, that means the sugar is not completely mixed in yet.

To plate, pull the marquise out of the freezer and cut it into 6 even squares.  Roll it in some cocoa powder and place it on a heaping spoonful of meringue.  Torch the meringue using a cooking torch and drizzle with caramel and nuts.  serve immediately....


Thursday, May 19, 2011

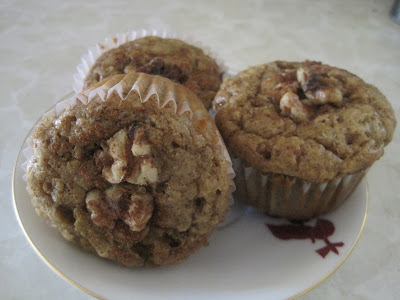
Banana nut muffins

When bananas are over ripe and brown......make muffins!  Recently my husband and I have been eating a lot of bananas.  Every weekend I buy about two bunches of bananas.  This past week I started putting strawberries in my morning oatmeal instead of bananas so the extra bananas became brown and over ripe.  I set them aside and let them sit for about another week.  The more brown a banana gets the sweeter it is, but be careful you don't want it to start liquefying on your kitchen counter.  In this recipe I added walnuts to the batter and garnished each muffin with a walnut.  Walnuts are an optional ingredient so feel free to mix it up with a different nut or not have nuts at all.  I like the Walnuts because it gives the muffins texture and an added flavor.

Ingredients:
4 ripe bananas 
1/2 cup softened butter
1 cup brown sugar
4 eggs
1/2 cup buttermilk
1 tsp vanilla
2 cups flour
1 tsp salt
2 tsp baking soda
2 tsp baking powder
2 tsp cinnamon
1/2 cup chopped walnuts
about 1/2 cup whole walnuts
mush up the bananas in a bowl with a potato masher.  In another mixing bowl add the sugar and butter and cream together.  Then add the eggs buttermilk and vanilla and mix until smooth.  The batter will be a bit lumpy but don't worry about it.  Add in your mashed bananas.  Rinse out the bowl you used for the bananas and dry it.  In this bowl add the rest of the ingredients except for the nuts.  Whisk it so that all of the dry ingredients are mixed together.  Slowly add this to your banana mixture while mixer is on a low speed.  When all ingredients are mixed together fold in the chopped nuts using a spatula.
lightly spray a muffin tin and use muffin cups.  Fill each muffin cup almost to the top.  Place a whole walnut in each muffin and garnish with a sprinkle of cinnamon.  The batter should make about 24 muffins.  Pre heat the oven to 350 degrees F and cook the muffins for about 25-30 minutes.  To make sure they are done insert a toothpick into the center of one, if it comes out clean they are done.  Allow them to cool for about 5 minutes and enjoy!