Showing posts with label baking. Show all posts

Tuesday, March 15, 2011

Hazelnut chocolate tart

I wanted to make these because I bought a set of six little tart pans, perfect for one serving and I was dying to use them.  If you are a chocolate lover you will love this tart.  For the filling I used agave syrup which you can find in the baking section of any grocery store.  If you don't want to use agave syrup you can substitute it with corn syrup.  I got the idea for this recipe from the "Golden Book of Desserts".  The idea came from the chocolate pecan tart.  These tarts were so good but next time I may roast my hazelnuts first.
Here is what you will need:

 Pastry
1 1/4 cups flour
1/2 cup confectioners sugar
1 large egg yolk
7 tbsp cold butter
2-3 tsp iced water

 Filling
1/2 cup of coarsely chopped dark chocolate
1/4 cup butter
2/3 cup firmly packed brown sugar
2/3 cup agave syrup
3 large eggs, lightly beaten
1 tsp vanilla
2 cups chopped hazelnuts

First make the pastry.  In a bowl add the butter, flour, and confectioner sugar.  Mix this with a pastry cutter.  I like to start with a pastry cutter and then use my hands.
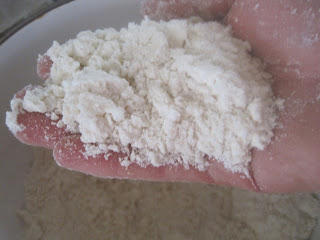


Mix until it is crumbly.  Add the egg yolk and 2 tsp of water.  Mix this using your hands.  Add more water 1 tsp at a time until you are able to pull the dough together into a nice ball.  I ended up using 4 tsp of water.  It will depend on the moisture in the air on how much water you will need.


wrap the ball in plastic wrap and let it rest in the refrigerator for about 30 minutes.
Take your pastry dough out of the refrigerator and cut it in half.  Roll out one half to about 1/4 inch thick.  To lift the dough roll it lightly around your rolling pin and place a pastry tin in front of it.  Gently unroll the dough over the top of the tin.  Using your fingers, push the dough down and into the sides of the tin then push your hand down over the top using the top of the tin as a cookie cutter.  Remove the excess and roll it out again.  Repeat this six times with all of your tins, then return them to the refrigerator for 30 minutes.
Preheat the oven to 350 degrees F.

Line each tart shell with parchment paper and fill with beans, or pie weights.  Place in the oven for about 15 minutes, or until a light golden brown.


To make the filling,  put your chocolate chips in a double broiler and cook over a slightly simmering water until full melted.  Beat the butter, and brown sugar together until creamy.  Add the agave syrup and beat again until smooth.

While the mixer is on low, slowly add the egg, vanilla, and then chocolate, continue to mix until everything is incorporated.  Stir in the hazelnuts by hand.

Pour the filling into your pastry shells and cook for about 30 minutes or until set.  This tart cooks like a pecan pie, when it jiggles slightly in the middle it is done.


Allow the tarts to cool, and then remove them from there tins.  Decorate however you like.  I sprinkled powdered sugar on mine, then cut a flower out of a piece of paper.  Using the flower as a stencil I placed it on each tart and sprinkled cocoa powder on them.  You can also garnish them with melted chocolate and roasted hazelnuts.  Serve with whip cream or ice cream.


Wednesday, January 26, 2011

Banana cupcakes with Nutella frosting


I had a jar of Nutella in my cupboard that has been there for a long time.  Today I decided it was time use it, and since I love the combination of Nutella and bananas I decided to make banana cupcakes.  I also wanted to try out piping, something I've never done before.  It was a lot of fun even though what I did was pretty basic.  I think many piping creations are in my future.

For the banana cupcakes you will need:

1 1/2 cups flour
3/4 cups brown sugar
1 tsp baking powder
1/2 tsp baking soda
1/4 tsp salt
1/4 tsp nutmeg
1 stick of melted butter
2 eggs
1/2 tsp vanilla
2 cups of mashed bananas (about 4 bananas)

For the frosting:
8 oz of cream cheese
1/2 cup Nutella
1 tsp vanilla
2 cups powdered sugar

Preheat oven to 350 degrees F.  Whisk together the dry ingredients.  If you live at a high altitude make sure you are adjusting the amount of baking powder you are putting into your mixture.  Make a well in the center and set aside.


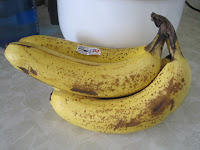
Use ripe bananas, I bought these a week ago and let them ripen on my counter top.
Mash the bananas using a fork or a hand held potato masher.  Add the rest of the wet ingredients and whisk them together until mixture is semi-smooth.
 Pour the wet ingredients into the well you made earlier.  Using a spatula mix the dry and wet together.  Don't use a beater because you don't want to over mix this recipe.  As soon as you can no longer see the dry mixture stop mixing.
Fill the cups about 3/4 of the way full.  Mine made a bit more than 12 cupcakes.  This is okay just make sure you fill the empty cups in the pan with water so that everything gets cooked evenly.

Cook for about 20-25 minutes.

In order to make sure they are done, insert a toothpick into the middle of one, If the toothpick comes out dry it is done.  Remove the cupcakes and allow them to cool.


To make the icing, beat together the cream cheese, vanilla, and Nutella.  Slowly add the powdered sugar.

Using a medium star pastry tip, place your pastry bag in a cup and using a spatula fill it with your frosting.
Don't fill the bag to the top, other wise you will have frosting coming out of the top while you are decorating.
Garnish the cupcakes with powdered sugar, and enjoy!  Store in an airtight container otherwise the frosting will harden.


Saturday, January 15, 2011

Snicker 'heath' doodle

My favorite cookie is the snickerdoodle.  I decided to do a little research because I wanted to know where the name originated from.  Needless to say.....I was dissapointed.  Once source said it came from the German word, schneckennudeln, which means snail noodles.  That can't be right, first of all snail noodles makes me think of snail poop...and why would you name such a good tasting cookie after snail excrement?    Another source stated that the word schneckennudeln referred to cinnamon rolls, which makes more sense because they look like snails,  and snickerdoodles taste similar to cinnamon rolls.  At this point I stopped looking for the meaning of schneckennudeln and  was satisfied that the meaning had been lost in translation.  In this recipe I  tried to make it more like a Snickers bar by adding heath bar toffee bits, that way, in my own head the name snickerdoodle made more sense.

Snicker 'heath' doodle
1 cup unsalted butter cubed
1 cup granulated sugar
2 eggs
2 3/4 cups unbleached flour
2 tsp cream of tartar
1 tsp baking soda
1/4 tsp salt
1 cup heath bar toffee bits
3 tbsp sugar
1 tbsp cinnamon

Heat the oven to 400 degrees F.

Using an electric mixer with a whisk attachment cream the butter.  Gradually add the sugar with the mixer on high.  Beat in the eggs one at a time.
In another bowl sift in the flour, cream of tartar, soda, and salt.  Because I live at such a high elevation I used a little bit less than 2 tsp cream of tartar....about 1 3/4 tsp.  If you don't make this adjustment in a high elevation you will end up with flat and crispy cookies.
Blend the flour mixture slowly into your mixer, 1/2 cup at a time.  After you have added about 1 1/2 cups of the flour mixer switch the attachment on the mixer to a paddle, or flat beater and add in the remaining flour.  Scrape the sides and add your toffee bits, and mix for another 2-3 minutes on a medium speed.


Shape the batter into balls, I like using a cookie scoop because that makes my cookies more uniform and therefore they cook more evenly.  Using the same bowl you had your flour mixture in, add the 3 tbsp of sugar and 1 tbsp of cinnamon.
I usually do three at a time because it goes faster.  Just  throw the cookie balls in the cinnamon mixture and swish the bowl around until the balls are completely covered.
Place them on a cookie sheet that has been sprayed with PAM about 1-2 inches from each other.  Place on the middle rack of the oven and set your timer for about 6 minutes.  When the timer goes off and the cookie looks done, check it by lightly pressing down with one finger on the cookie.  If the cookie springs back up it is done.  If you don't trust yourself to judge if the cookie is done this way you can put a tooth pick through it.  You may have to leave the cookies in for another 2 minutes.

When the cookies are done pull them out and let them cool for a minute on the sheet.  Then take them off of the hot cookie sheet with a spatula and let them cool on a rack for about 10 minutes.  They may be a little gooey on the inside right when they come out of the oven but if you let them cool for about 10 minutes they will just be soft and fluffy on the inside.

To store them keep them in an air tight container on the counter top.  They will last even longer if you store them in the refrigerator, but I don't think these cookies will last that long in your kitchen.  I've eaten five already.....